Cronjob Setup
Server-side
Introduction
ASA2's cronjobs can be executed via the bash script script.sh in the plugin subdirectory "scripts".
Execution syntax:
bash [wp_path]/wp-content/plugins/amazon-simple-affiliate/scripts/script.sh [name] [options]To be replaced:
- [wp_path] with the local server path of your WordPress installation
- [name] with the internal cronjob name which can be found on the respective page of the cronjobs
- [options] with a list of options which are documented on the respective page of the cronjobs (optional)
Requirements
- script.sh must be executable
- You must know the server-side path to script.sh
The info box "Cronjobs" in the "Service" subsection will help you to collect information about these requirements.
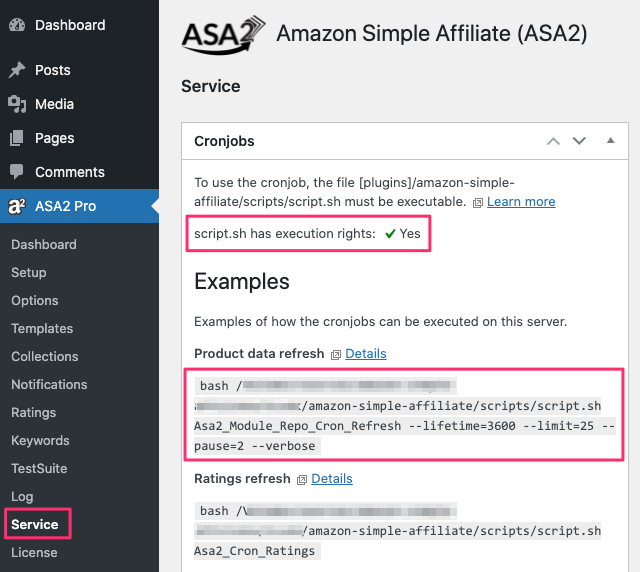
Executable script.sh
The upper area of the infobox shows whether script.sh is executable on your server, which is a prerequisite for running the cronjob.
INFO
script.sh must be executable to be able to run the server-side cronjob
If it shows as not executable, click the link that tries to fix that. If this does not work, you can do this manually with the following shell command:
// in amazon-simple-affiliate/scripts/
chmod 0755 script.sh
Path to script.sh
In the lower part of the info box you will see the path to the script.sh on your server including a sample execution. You can copy this path for the configuration on your server which is described in more detail below.
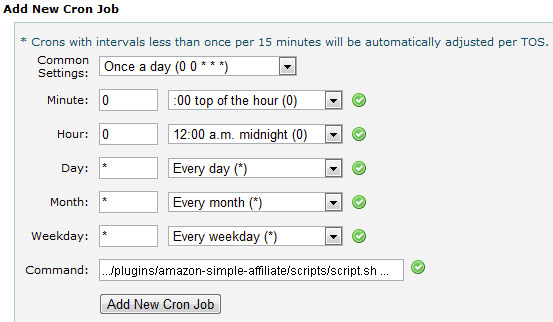
SSH
If you have SSH access to your server and the right to setup cronjobs, you can use the command crontab -e on the shell.
Replace [wp_path] with the local server path of your WordPress installation.
0/3 * * * * bash /[wp_path]/wp-content/plugins/amazon-simple-affiliate/scripts/script.sh Asa2_Cron_RatingsThis is a good tutorial about cronjobs: Scheduling Tasks with Cron Jobs
Webhosting Control Panel
Many web hosting companies provide control panels for their customers. If you are one of them, you might be able to find a section in your control panel to manage your cron jobs.

Cron REST API
Using ASA2's Cron REST API allows you to execute the cronjobs via URL. This option was introduced because some web hosts support running cronjobs only by URL and unfortunately not at shell level.
Activation
Before you can use the Cron REST API, you need to activate it via the option "Cron REST API" in ASA2's options section "Advanced".

Token
For ASA2 to accept the URL to run a cronjob, a token unique to your installation must be present as a parameter in the URL. This must consist of alphanumeric characters and can be entered in the "Cron REST API Token" field. It is recommended to use the button "Generate new token" to create a random token.

URL Syntax
[site-domain]/[wp-api-path]/asa2/v1/[cronjob-endpoint]/?token=[token][options]- [site-domain] is the domain of your website, e.g. https://example.com
- [wp-api-path] is "wp-json" by default (see Routes and Endpoints)
- [cronjob-endpoint] depends on the cronjob you want to run. Every ASA2 cronjob has its own endpoint name, which you can find in the "REST API Endpoint" section of the respective page:
keywords-preload(Keywords Cronjob)product-notification( Products Notifications Cronjob)product-update(Product Update Cronjob)ratings(Ratings Cronjob)
- [token] must be the token you configured as explained in Cronjobs Setup Rest Api Token
- [options] can be a list of options that are supported by the cronjob in URL parameter syntax, e.g. &limit=3&cat=32,42
Examples
To run the product update cronjob with a limit of 10 products, category and lifetime filter, the URL would look like this:
https://example.com/wp-json/asa2/v1/product-update/?token=[your-token]&limit=10&cat=31,40&lifetime=7200To run the ratings cronjob with a quantity setting of 5, this is the URL:
https://example.com/wp-json/asa2/v1/ratings/?token=[your-token]&quantity=5WP Cron API
If you do not have access to real server-side cronjobs on your webserver, WP Cron API might be an alternative. However, the use of server-side cronjobs is highly recommended as the WP Cron API is executed on visitor accesses. But this is exactly what we want to avoid when using cronjobs.
INFO
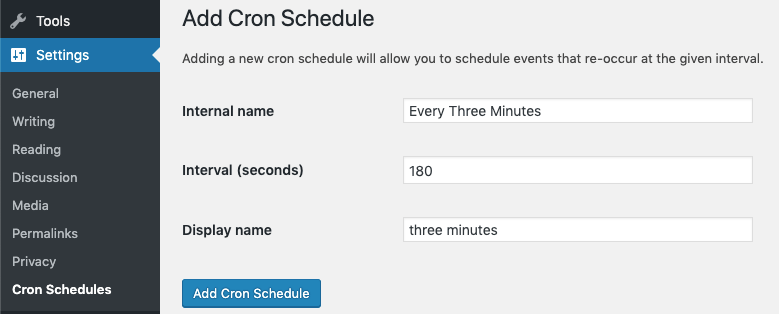
Add Cron Schedule
In this example the plugin WP Crontrol is used for the setup.
For this example we want to run a cronjob every 3 minutes. So we have to configure an interval of 3 minutes for the WP Cron API if this is not already available.
After you have installed and activated the plugin WP Crontrol, open the section "Settings / Cron Schedules" and enter the new cron schedule, in this case 180 seconds for 3 minutes.
Using the Cron Wrapper
Initialization
The "Cron Wrapper" is a PHP helper class that allows you to run any ASA2 cronjob. During initialization it only expects the name of the cronjob, which you can find on the pages of the respective cronjob. In this example, we use the Product Update Cronjob, so the name is Asa2_Module_Repo_Cron_Refresh.
INFO
Replace the name Asa2_Module_Repo_Cron_Refresh with the cronjob name of your choice.
<?php
$cronWrapper = new \Asa2\Cron\Wrapper('Asa2_Module_Repo_Cron_Refresh');
Options
If desired or necessary, you can also define options for the execution of the cronjob. A list of all options can also be found on the page of the respective cronjob.
<?php
$cronWrapper->setOptions([
    'limit' => 3,
    'cat' => '31,40'
]);
Execute
Finally, the cronjob can be executed.
<?php
$cronWrapper->execute();
Summary
So, putting it all together, the code for using the Cron Wrapper looks like this:
<?php
$cronWrapper = new \Asa2\Cron\Wrapper('Asa2_Module_Repo_Cron_Refresh');
$cronWrapper->setOptions([
    'limit' => 3,
    'cat' => '31,40'
]);
$cronWrapper->execute();
Add Cron Event
To use the Cron Wrapper together with WP Crontrol, open section "Tools / Cron Events" and click the tab "Add PHP Cron Event". Enter the code discussed above (see Cronjobs Setup Cron Wrapper Summary) into the field "PHP Code" and adjust it according to your needs.
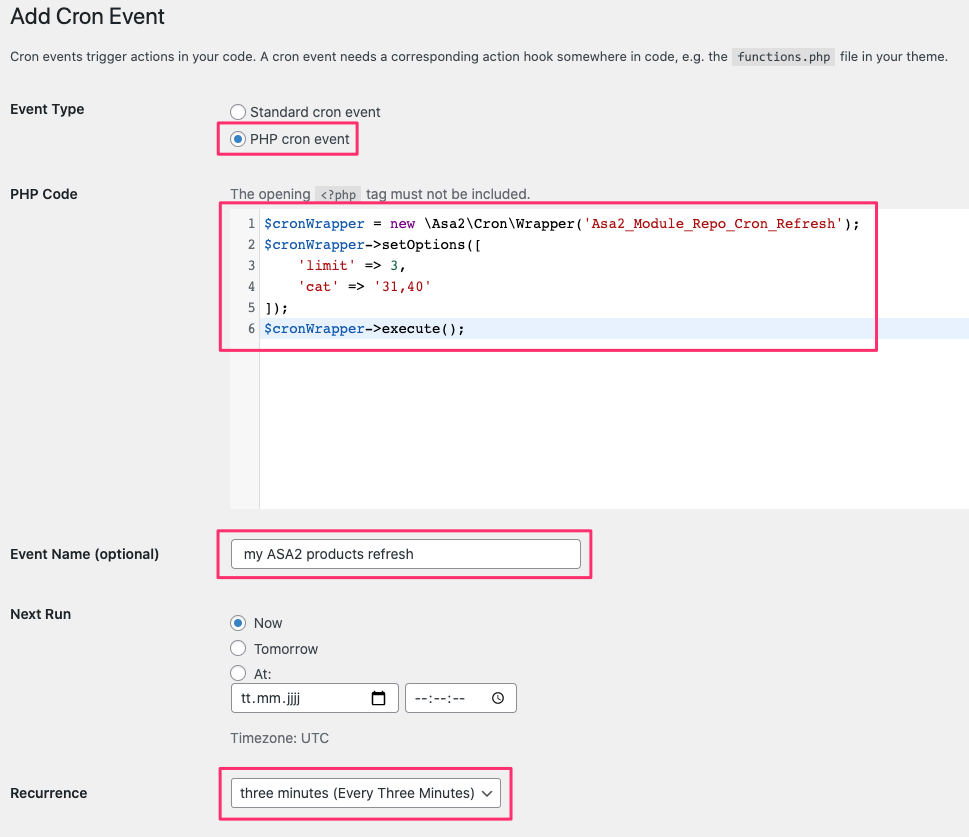
After saving the cron event, you will see it in the list of WP-Cron Events. The "Next Run" column displays the time of the next execution of the job. From now on, the function for updating products runs regularly at the configured intervals.

To get details about the result of a job, see the cronjob repo refresh debugging section.
Recommended Recurrence
Depending on the purpose and individual settings, each cronjob may have a different recommended frequency for execution.
Please see the "Recommendations" section on the respective cronjob page for more details.
- Keywords Cronjob Recommendations
- Products Notifications Cronjob Recommendations
- Product Update Cronjob Recommendations
- Ratings Cronjob Recommendations
Debugging
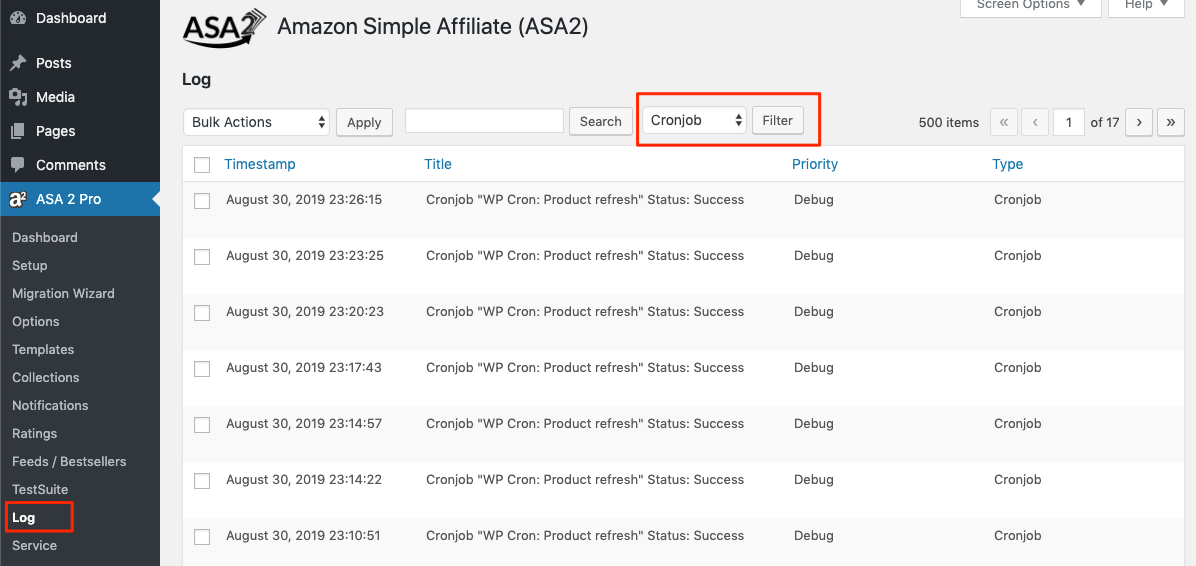
To get information from the execution of a cronjob, you can enable the option Options Log Cronjobs in the section "Options / Logging".
Then you get an entry in the "Log" area for each cronjob execution. If you move your mouse over an entry, the link "Details" will appear, which opens a popup with further details.